In this article we can learn how to configure SharePoint 2013 Search. In SharePoint 2013 the two search engines "SharePoint Search" and "FAST Search Server for SharePoint" was combined into one Search Engine. Much of the search enhancement is due to Analytics moving into search. This will make an Analytics Processing Component in SharePoint Server 2013 run various analytics jobs to analyze content in the search index and user actions that were performed on a site to identify items that users perceive as more relevant than others.
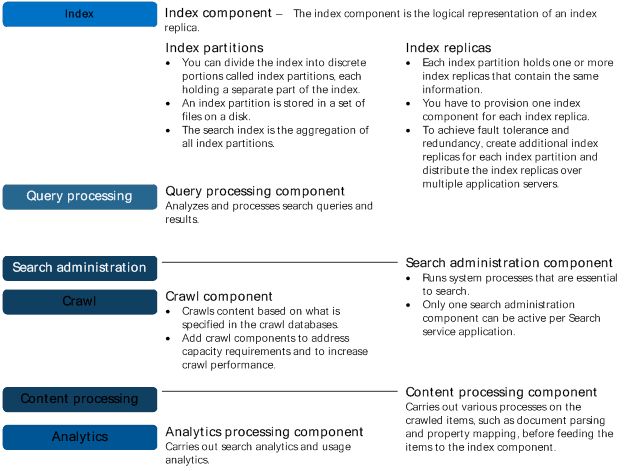
Search components
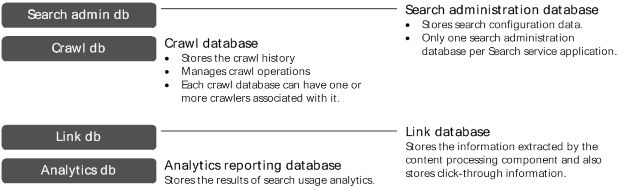
Search databases
-->
-->
Crawl component
The crawl component crawls the content sources. You can crawl a wide variety of content sources, for example file shares, SharePoint content, line of business applications and many more. To retrieve information, the crawl component connects to the content sources by invoking the appropriate indexing connector or protocol handler. After retrieving the content, the crawl component passes crawled items to the content processing component.
Content processing component
The content processing component processes crawled items and sends these items to the index component. The content processing component performs operations such as document parsing and property mapping. It also performs linguistics processing such as language detection and entity extraction. The component transforms crawled items into artifacts that are included in the search index. The content processing component also writes information about links and URLs to the link database. In turn, the analytics processing component writes information related to the relevance of these links and URLs to the search index through the content processing component.
Analytics processing component
The analytics processing component analyzes crawled items, which is referred to as search analytics, and how users interact with search, which is referred to as usage analytics. Examples of search analytics are links, anchor texts and metadata. An example of usage analytics is the number of times an item is viewed. The analytics processing component analyzes search analytics and usage analytics. Search analytics information is stored in the link database and usage analytics information in the analytics reporting database.
Index component
The index component is the logical representation of an index replica. In the search topology, you have to provision one index component for each index replica. The index component receives processed items from the content processing component and writes those items to an index file. Index files are stored on a disk in an index replica. The index component receives queries from the query processing component and returns result sets. You can divide the search index into discrete portions, called index partitions. Each index partition holds one or more index replicas. The search index is the aggregation of all index partitions.
Query processing component
The query component analyzes and processes queries and results. When the query processing component receives a query, it analyzes and processes the query to optimize precision, recall and relevance. The processed query is submitted to the index component. The index component returns a result set based on the processed query to the query processing component, which in turn processes that result set, before returning it to the front-end.
Search administration component
The search administration component runs the system processes for search. This component performs provisioning, which is to add and initialize instances of the other search components.
Crawl database
The crawl database stores tracking information and details about crawled items. For example, it stores information about the last crawl time, the last crawl ID and the type of update during the last crawl.
Link database
The link database stores information extracted by the content processing component. It also stores information about the number of times people have clicked on a search result. The information is stored unprocessed; the analytics processing component performs the analysis.
Analytics reporting database
The analytics reporting database stores the results of usage analytics and extracts information from the link database when it is required.
Search administration database
The search administration database stores search configuration data and the access control list (ACL) for the crawl component. There can be only one search administration database per search service application.
Configure a Search service application in SharePoint Server 2013
In this session, we have to follow the following main tasks:
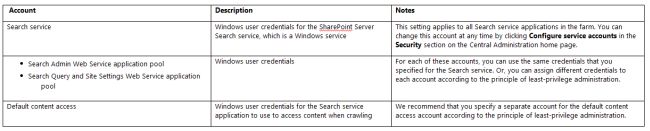
- Create accounts - certain domain user accounts are required specifically for a Search service application.
- Create a Search service application - A Search service application provides enterprise search features and functionality.
- Configure the Search service application - Basic configuration of a Search service application includes configuring a default content access account, an email contact, and content sources.
- Configure the Search service application topology - you can deploy search components on various servers in the farm. You can also specify which instance of SQL Server is used to host the search-related databases.
Create accounts that are required for a SharePoint Search service application
The following table lists the accounts that are required when a Search service application is created.
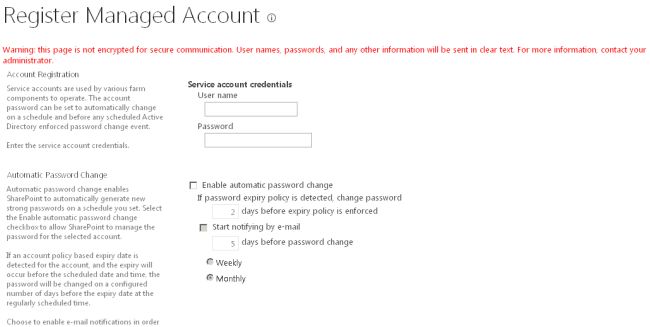
To register a managed account
Use the following procedure to register a managed account:
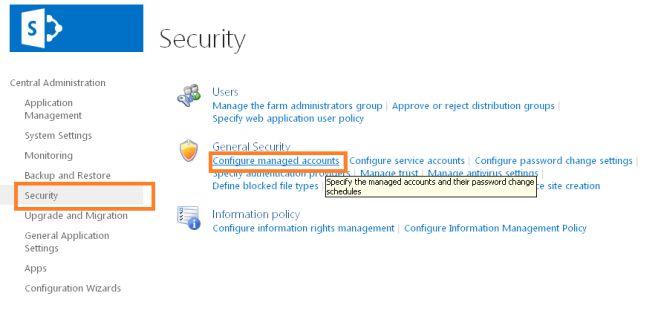
- On the "Central Administration" home page, in the "Quick Launch", click "Security".
- On the Security page, in the "General Security" section, click "Configure managed accounts".
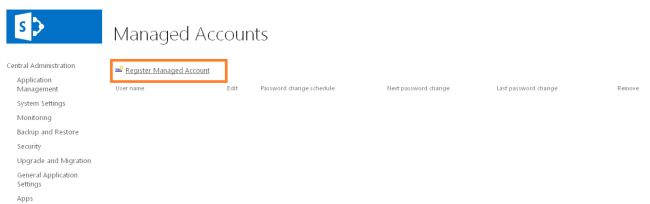
- On the "Managed Accounts" page, click "Register Managed Account".
- On the "Register Managed Account" page, in the "Account Registration" section, type the user name and password that you want to use as credentials for the service account.
- If you want SharePoint Server 2013 to manage password changes for this account, select the "Enable automatic password change" check box and configure the parameters for automatic password change.
- Click OK.
Create a SharePoint Search service application
Each Search service application has a separate content index. You can create multiple Search service applications if you want to have various content indexes for various sets of content. For example, if you want to segregate sensitive content (such as employee benefits information) into a separate content index, you can create a separate Search service application to correspond to that set of content.
How to create a Search Service application
Use the following procedure to create a Search Service application:
Verify that the user account that is performing this procedure is a member of the Farm Administrators group for the farm for which you want to create the service application.
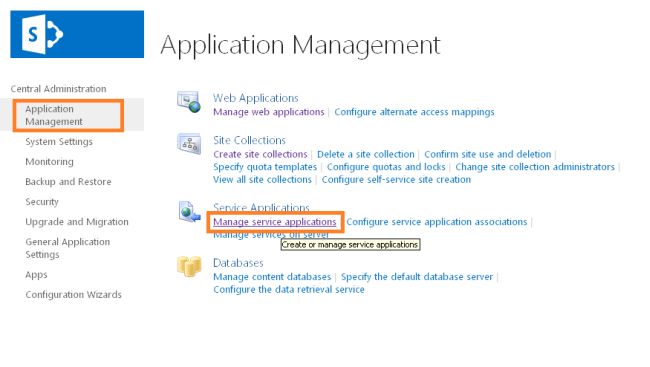
On the "Central Administration" home page, in the "Application Management" section, click "Manage service applications".
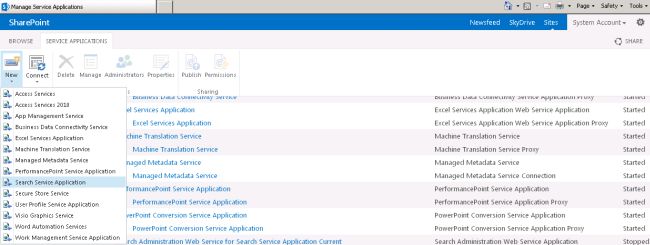
In the "Manage Service Applications" page, on the ribbon, click "New", and then click "Search Service Application".
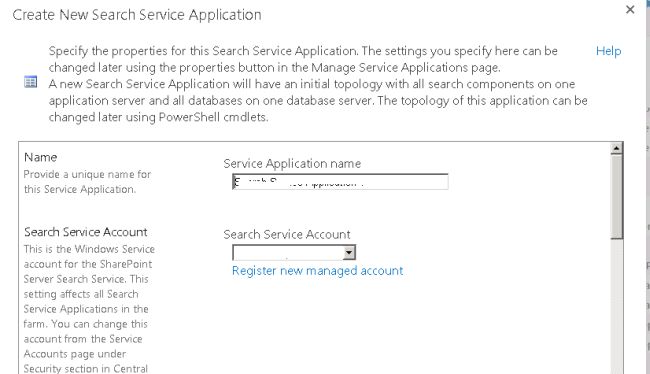
On the Create New Search Service Application page, do the following:
- Accept the default value for the "Service Application" name, or type a new name for the Search Service application.
In the "Search Service Account" list, select the managed account that you registered in the previous procedure to run the Search service.
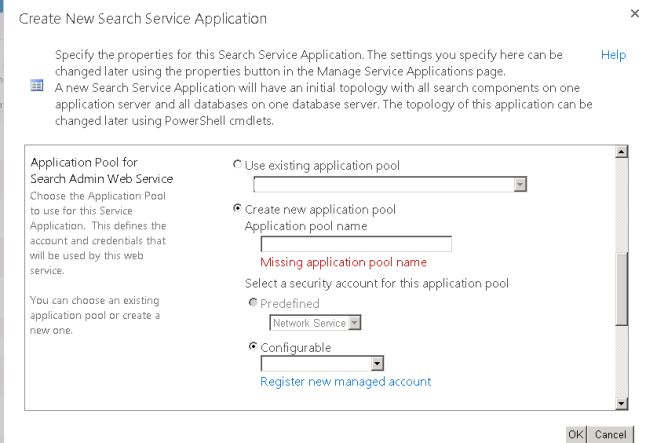
In the "Application Pool for Search Admin Web Service" section, do the following:
- Select the "Create new application pool" option, and then specify a name for the application pool in the"Application pool name" text box.
- In the "Select a security account for this application pool" section, select the "Configurable" option, and then from the list select the account that you registered to run the application pool for the Search Admin Web Service.
In the "Application Pool for Search Query and Site Settings Web Service" section, do the following:
Choose the "Create new application pool" option, and then specify a name for the application pool in the"Application pool name" text box.
In the "Select a security account for this application pool" section, select the "Configurable" option, and then from the list select the account that you registered to run the application pool for the Search Query and Site Settings Web Service.
Click "OK".
Configure the SharePoint Search service application
You configure a Search service application on the Search Administration page for that service application. Use the following procedure to go to the Search Administration page for a particular Search service application.
- Go to the Search Administration page
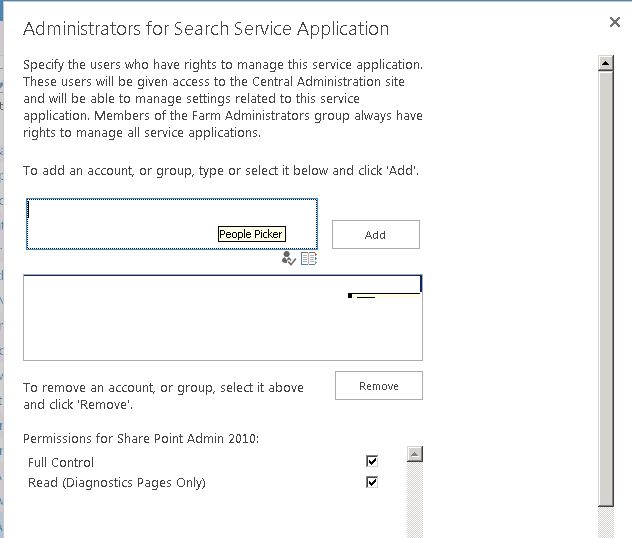
- Verify that the user account that is performing this procedure is an administrator for the Search service application that you want to configure.
- Please add the administrator account on the next screen.
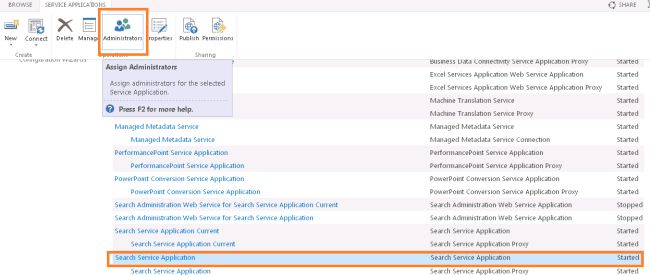
- On the home page of the Central Administration website, in the Application Management section, click Manage service applications.
- On the Manage Service Applications page, click the Search service application that you want to configure.
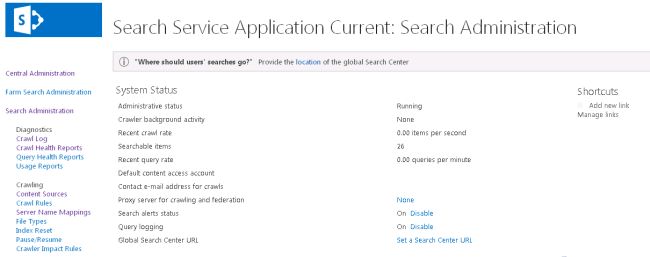
On the Search Administration page, configure the settings as described in the following sections:
- Specify the default content access account
- Specify the contact email address
- Create content sources
Specify the default content access account
When you create a Search service application, the account that you specify for the Search service is automatically configured as the default content access account. The crawler uses this account to crawl content that does not have an associated crawl rule that specifies a different account. For the default content access account, we recommend that you specify a domain user account that has read access to as much of the content that you want to crawl as possible. You can change the default content access account at any time. If you have to crawl certain content by using a different account, you can create a crawl rule and specify a different account for crawling. For information about how to create a crawl rule, see "Manage crawl rules" (SharePoint Server 2013 Preview).
Use the following procedure to specify the default content access account.
Specify the default content access account
Use the following procedure to specify the default content access account:
On the "Search Administration" page, in the "System Status" section, click the link in the default content access account row.
In the "Default Content Access Account" dialog box, in the "Account" box, type the account that you created for the content access in the form domain\user name.
Type the password for this account in the "Password" and "Confirm Password" boxes.
Click "OK".
Specify the contact email address
The Search service writes the contact email address to the logs of the crawled servers. The default contact email address, someone@example.com, is a placeholder. We recommend that you change this to an account that an external administrator can contact when a crawl might be contributing to a problem such as a decrease in performance on a server that the search system is crawling.
Specify the contact email address
Use the following procedure to specify the contact email address:
On the "Search Administration" page, in the "System Status" section, click the link for the contact e-mail address.
In the "Search E-mail Setting" dialog box, in the E-mail Address box, type the email address that you want to appear in the logs of servers that are crawled by the search system.
Click "OK".
Configure Content Source
Use the following procedure to configure the content source:
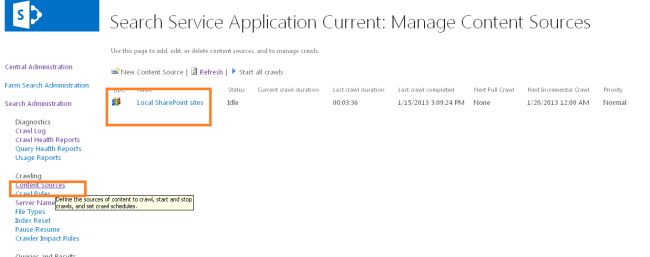
- Click on the content source on the right side as shown below:
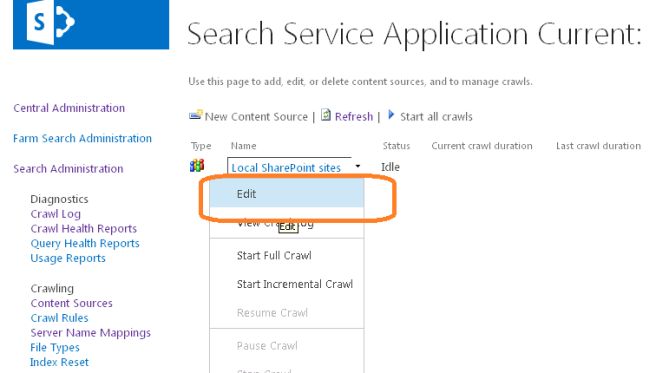
- Click on the Edit as shown below for the Local SharePoint Sites:
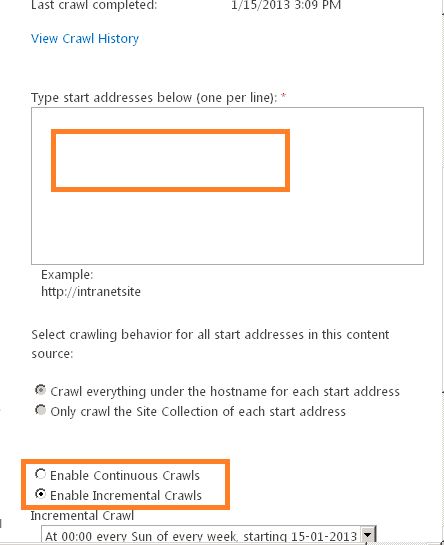
- Please make sure you have added your site URL in the following rectangular space with each site in a separate new line.
- Please configure an incremental crawl and a full crawl.
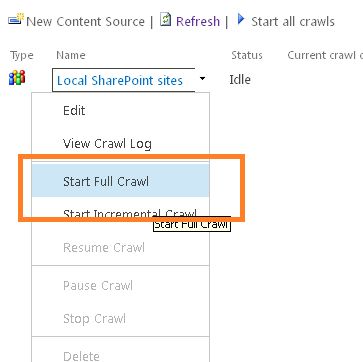
- Once you are done with the steps above, please start a full crawl.
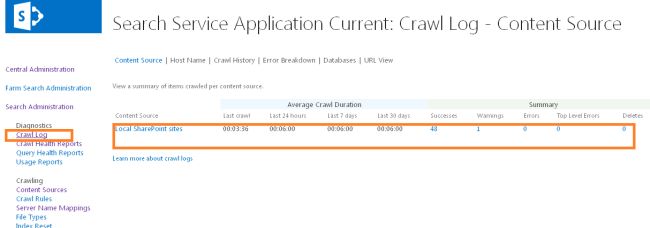
- Please wait until the crawl is over. It will take some time to finish the crawl.
- You can click on the Crawl Log and you will see the contents that were crawled, as in:
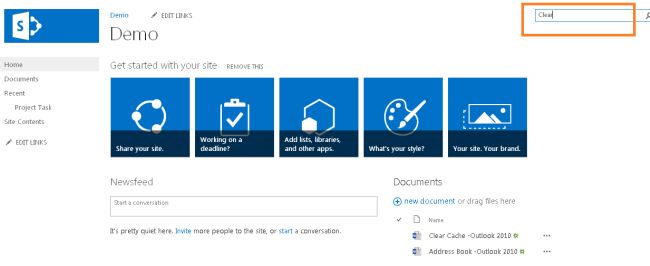
- Now go to the site which we have added to the content source and enter something to search for as shown below:
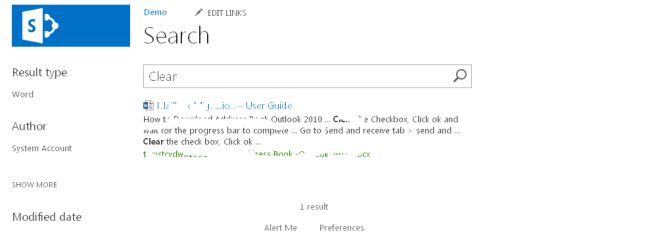
- You will see the results once the search button is clicked, as in:
- We even can now apply filters with a progress bar. That's a Great thing. When you wait on a searched element, you will even be prompted by a new great tool where you can:
- Open the searched element
- View the library
- Send the searched element.