Thursday, April 4, 2013

How to use SQLserver 2008 profiler


Introduction

SQL Server Profiler is a powerful tool that is available with SQL Server since a long time; however, it has mostly been underutilized by DBAs. SQL Server Profiler can perform various significant functions such as tracing what is running under the SQL Server Engine’s hood, and finding out how queries are resolved internally and what scripts are running to accomplish any T-SQL command. The major functions this tool can perform have been listed below:
  • Creating trace
  • Watching trace
  • Storing trace
  • Replaying trace
Trace includes all the T-SQL scripts that run simultaneously on SQL Server. As trace contains all the T-SQL scripts running on SQL Server, it often tends to become considerably huge. Hence, it is always a good practice to capture only those data that are actually required for analysis.

Dilemma to use on Production Server

SQL Server Profiler has a lot of potential as a tool and offers several advantages. Unfortunately, developers have been keeping their hands off from this tool and usually give two major excuses.
  • Reason 1: Profiler adds too much overhead to production server.
  • Reason 2: Profiler accumulates plethora of data making it extremely intricate to analyze them afterwards.
It cannot be denied that both the above excuses are valid reasons and play a significant role in discouraging developers from using the profiler. When a profiler is run over a production server it adds additional load on the CPU. However, the real question is – How much load does the profiler add to CPU? It may be possible that the production server’s CPU is not used more than 50% at all, and running the profiler over that database will not degrade the performance.
If the profiler is configured appropriately to trace only relevant data for analysis, it will diminish the additional load that is introduced while it is running. If the profiler is run for a longer duration, then to capture the event of longer duration it is very important to collect selective data, otherwise the collected data can outgrow the space on the server.

Profiler Terminology

It is important to understand profiler terminology before digging into its details and finding how it works.
Event - An event is an action within an instance of SQL Server Database Engine. Some good examples of event are running any T-SQL or performing any operation in the SSMS that is related to database; running stored procedures, and creating jobs.
Event Class - An event class can be defined as a type of event that can be traced. Examples of event classes are SP:Starting and RPC:Completed.
Event Category – Group of events are called an event category. Examples of event category are Stored Procedure and Locks. In fact, there can be multiple event categories that can be selected for single trace.
Data Column - Data column is an attribute of an event class captured in the trace. Data column contains value of an event class.
Filter –Filters are used to create selectiveness in data that are collected in trace.
Trace - A trace captures data based on the selected event classes, data columns, and filters. A trace devoid of filter can be very hefty. Columns that are indispensable for the analysis should be selected only in trace. Trace can be saved in the database as well as in trace files.
Template - A template defines the default configuration for a trace. Templates can be saved, imported and exported between SQL Server instances. Templates from one SQL Server version cannot be imported to a different SQL Server version. SQL Server 2009 comes with 9 pre-created templates. The default template is a standard template that captures all SP and T-SQL batches. It additionally logs general database server activity.
Some very basic examples are presented below where data has been captured.

Starting the Profiler

SQL Server profiler is a component of client tools and can be installed independently from SQL Server Database Engine. It is mandatory for the user to have “system admin” rights to start the profiler. It can be started using the following methods.
1. Going to Start >> All Programs >> Microsoft SQL Server 2008 >> Performance Tools >> SQL Server Profiler
2. From SQL Server Management Studio >> Go to Tools >> SQL Server Profiler
3. For SQL Server 2008, type profiler in the command prompt.
4. For SQL Server 2005, type profiler90 in the command prompt.

Collecting Data

Once the profiler is started, connect it to any database. As discussed earlier, a profiler is not restricted to connecting only to the local database. With appropriate authentication and system admin role, it can connect to any database and capture the data.
Once the profiler is started click on Menu >> File >> New Trace.
This will display a login prompt very similar to SQL Server Database Engine. Connect with the appropriate username and password.
It will display the ‘Trace Properties’ screen. On this screen you can enter the trace name. You will notice that trace provider name, type and versions are pre-populated and cannot be altered. These are set based on which SQL Server instance you are connected with.
The ‘Trace Properties’ screen contains a drop-down for template selection, which is labeled with ‘Use the template’. As mentioned earlier, the default template selected is standard. We can see what events are included in the Standard template in the next tab, ‘Events Selection’.
The ‘Event selection’ screen contains a checkbox that can be configured as per the requirement of data to be collected. The same screen contains a ‘Column Filters’ button, which when clicked brings up another screen that can be used to further filter trace data.
There is another button named ‘Organize Columns’ on the same screen. This screen can be used to organize and group columns. Please note that columns cannot be grouped or ordered once the process of trace collection has begun.
The ‘Trace Properties’ screen contains a ‘Run’ button. When you click on this button, it runs the trace. The trace can be paused or stopped as required using the play menu on top.
This data can be saved in database and trace file or saved as XML. Trace file can be imported back in profiler, and profiler can re-run the whole scenario. Once the trace file is saved in database table, it can be queried by using T-SQL.

Summary

This article is a prologue to SQL Server Profiler. In the next article, I will talk about filtering and organizing columns. In addition, I will include storing trace file in the database table and querying table.

Wednesday, April 3, 2013

How to create a Shutdown/Restart/Logoff Windows 8 Tile for the Start menu (PowerShell)

Script to create a Shutdown / Restart / Logoff Windows 8 Tile for the Start menu ( PowerShell )

Introduction

This PowerShell script shows how to create a Shutdown, Restart or Logoff Windows 8 tile for the Start menu.


Demo


Get Microsoft Silverlight
-->

Scenarios

In Windows 8, without a Start button, properly shutting down or rebooting Windows can be a bit of a chore. Many users want to shut down or reboot Windows in just one click. This script enables users to click on a tile to shut down, reboot or log off Windows on the Start menu.

Script

Step1: Run the script in the Windows PowerShell Console, type the one command: Import-Module <Script Path> at the prompt.
For example, type Import-Module C:\Script\ CreateWindowsTile.psm1This is shown in the following figure.
Step 2: You can type the command Get-Help New-OSCWindowsTile -Full to display the entire help file for this function, such as the syntax, parameters, or examples.

-->


Example

Example 01: Type New-OSCWindowsTile command in the Windows PowerShell Console.
This command will create a shutdown, restart and logoff Windows 8 tile to the Start menu.
As you can see, in the following figure, the shutdown, restart and logoff Windows 8 tile has been created successfully.
Here are some code snippets for your references. To get the complete script sample, please click the download button at the beginning of this page. 
PowerShell
#create a new shortcut of shutdown 
$ShutdownShortcutPath = "$env:ProgramData\Microsoft\Windows\Start Menu\Programs\Shutdown.lnk" 
$ShutdownShortcut = $WshShell.CreateShortcut($ShutdownShortcutPath) 
$ShutdownShortcut.TargetPath = "$env:SystemRoot\System32\shutdown.exe" 
$ShutdownShortcut.Arguments = "-s –t 0" 
$ShutdownShortcut.Save() 
  
#change the default icon of shutdown shortcut 
$ShutdownLnk = $Desktop.ParseName($ShutdownShortcutPath) 
$ShutdownLnkPath = $ShutdownLnk.GetLink 
$ShutdownLnkPath.SetIconLocation("$env:SystemRoot\System32\SHELL32.dll",27) 
$ShutdownLnkPath.Save() 

Download Script

To download the full script please click here: Download Script
-->

Tuesday, April 2, 2013

How to create a bootable USB flash drive to install Windows 8 Developer Preview


Instructions (using the command line)

At a high level, the steps are:
  1. Mount the Windows 8 Developer Preview ISO image on your computer
  2. Format a USB flash drive
  3. Copy the Windows 8 files onto the USB flash drive
  4. Make the USB flash drive bootable
  5. Install Windows 8 from the bootable flash drive


-->

Step 1: Mount the Windows 8 Developer Preview ISO image on your computer

The first step is to mount the ISO image on your computer. Since Windows 7 doesn’t have the capability to mount an ISO image, you’ll have to use a 3rd party tool.
  1. Download the Windows Developer Preview ISO image (choose one of the three available)
  2. Using your favorite ISO image software, mount the ISO image on your computer
To check that the ISO image mounted successfully, you should be able to browse the Windows 8 files, as shown below.
windows8_files_screen_shot

Step 2: Format a USB flash drive

In case you’re wondering how big of a USB flash drive you need, an 8GB drive is perfect since it can accommodate any of the three available ISO images. Here are the steps to format a USB flash drive.
  1. Insert a USB flash drive into your computer
  2. Start a Command Prompt as an Administrator and type diskpart. This starts the Disk Partition tool which you need to use to format the flash drive. Once you see the DISKPART command prompt, type in the following commands
  3. DISKPART> list disk                                 /* shows list of active disks */
  4. DISKPART> select disk #                         /* # is the number for your USB flash drive */
  5. DISKPART> clean                                     /* deletes any existing partitions on the USB flash drive */
  6. DISKPART> create partition primary     /* create a primary partition on the USB flash drive */
  7. DISKPART> select partition 1                 /* select the newly created partition */
  8. DISKPART> active                                    /* make the new partition active */
  9. DISKPART> format FS=NTFS                 /* format the USB drive with NTFS file system */
  10. DISKPART> assign                                   /* assign a volume and drive letter to the USB drive */
  11. DISKPART> exit                                        /* exit Disk Partition */
At this point, your USB flash drive should be showing up in Windows Explorer and have a drive letter assigned to it, e.g. F:\.

-->

Step 3: Make the USB flash drive bootable

We just need to make the USB flash drive bootable before copying the files. To do this, you can use the Boot Sector Registration Tool (bootsect.exe) which is located in the boot folder of the Windows 8 ISO image.
  1. Start a Command Prompt as an Administrator and CHDIR into the boot folder of the Windows 8 ISO image, e.g. I:\boot where I:\ is the drive where the ISO image is mounted
  2. Type bootsect /nt60 E:                              /* where E: is the drive assigned to the USB flash drive */
You should see the following confirmation after bootsec.exe completes:
bootsect_screen_shot

Step 4: Copy the Windows 8 files onto the USB flash drive

From a command line, use XCOPY to copy the Windows 8 files to the USB flash drive . In the example below, I:\ is the drive where the ISO image is mounted. F:\ is the USB flash drive.
XCOPY I:\*.* F:\ /E /F /H

Step 5: Install Windows 8 from the bootable flash drive

Finally, follow these instructions to install Windows 8 on your computer.
  1. Remove your USB flash drive from your "source" computer and insert it into the "target" computer where you want to install Windows 8
  2. On the computer where you are installing Windows 8, press the power button to turn on the computer
  3. During boot up, select the USB flash drive to boot from (if you don't see the USB flash drive as an option, you may have to adjust your BIOS settings)
  4. Follow the instructions to install Windows 8 Developer Preview
Here is a screen shot from the boot manager on my computer showing the USB flash drive as an option.
boot_manager_screen_shot
I installed Windows 8 Developer Preview on a vanilla Dell Inspiron 15R laptop which unfortunately doesn't have touch (or any other sensors for that matter).
windows8_on_dell_screen_shot
The personalization steps in Windows 8 Developer Preview are really quick.

windows8_personalize_screen_shot
And here is the final screenshot of my shiny new Windows 8 installation!
windows8_start_menu_screen_shot

Monday, April 1, 2013

HOW TO SETUP DNS FOR SHAREPOINT SITE

Follow the steps below if you need to know how to set up DNS for a SharePoint site.
  1. Go to Central Administration
  2. Go to Operations tab. Under Global Configuration section, select Alternate access mappings
  3. On Alternate Access Mappings page, click on Edit Public URLs
  4. Select Alternate Access Mapping Collection, i.e. your  newly created website
  5. Under Intranet type in the internal web address that you would like for your site
  6. Under Internet type in the external (public) web address that you would like for your site
  7. Click “OK” when finish”
  8. Remote desktop to the MOSS server farm where your SharePoint site was deployed
  9. Go to IIS Manager
  10. Expand the Web Sites folder, right click on your website
  11. On the Web Site tab, click on the Advanced button. Click “Add” button
  12. On the Add/Edit Web Site Identification screen modify to suit your site according to the following:
  13. IP address: (All Unassigned)


-->

    TCP port: 80 (has to be 80)
    Host Header value: (This is the external/public address of your website that was entered in step 6)
  1. Click OK to save all changes
  2. On the Web Site tab, click on the Advanced button. Click Add.
  3. On the Add/Edit Web Site Identification screen modify to suit your site according to the following:
  4. IP address: (All Unassigned)
    TCP port: 80 (has to be 80)
    Host Header value: (This is the internal address of your intranet website that was entered in step 5)
  5. Click OK to save all changes. (OK for couple of screens so that you are looking at main IIS Web Sites folder)

Testing that the DNS works
  1. On your local machine, open Windows Explorer
  2. Go to C:\WINDOWS\system32\drivers\etc folder and open up the hosts file.
  3. Add the IP address entry corresponding to your website i.e.         xxx.xxx.xxx.xxx      <extranet/intranet URL>
  4. Save the file
  5. Open IE browser and type in the extranet/intranet URL to check that you can access the site.  If you can view the site, then you have setup DNS.

Friday, March 29, 2013

How to create a SharePoint 2010 site collection within SharePoint 2013


Understanding SharePoint 2010 Experience in SharePoint 2013

There are number of reasons why having co-existence of SharePoint 2010 and SharePoint 2013 experience you would need.
  1. If you want to have environment to try out custom solutions built for SharePoint 2010 in SharePoint 2013 environment
  2. If you want to test the upgrade and restore SharePoint 2010 environment in SharePoint 2013 environment before upgrading them.
  3. If you want to compare side by side functionality and feature set of SharePoint 2010 and SharePoint 2013

-->
Bottom line is you would never need SharePoint 2010 environment to test SharePoint 2010 functionality once you built new SharePoint 2013 farm or upgrade to SharePoint 2013.
To create the new SharePoint 2010 site collection in SharePoint 2013 environment, Microsoft provides new option to choose “SharePoint 2010 Experience” on the site collection creation page. On this page, if you select “2010” experience, it would allow you to select SharePoint 2010 site templates to create SharePoint 2010 version of site collection in SharePoint 2013 environment.
Original Author : 

How to Install and configure workflow for SharePoint Server 2013

SharePoint 2013 introduced a new way of workflow management. Now workflow can be hosted in separate server – so scalable and reduces load on SharePoint Web Front End server. However this introduce a new level of complexity that we need to be aware of.

 Introduction

To use a windows server as workflow manager you need to install/configure Workflow Manager in the windows server. Workflow manager is a new kind of application server that host/manage workflow execution. SharePoint 2013 workflow is based on .net framework 4.0. Workflow Manager is designed with Window Azure hosting in mind, but now it supports on-premise installation. If organizations now want to host the workflow on-premise they can still use Workflow Manager but in future if they want to move to Windows Azure hosting for their workflow, the migration will be smoother with this Workflow Manager.

 You should Know

Before start installing/developing SharePoint Manager you need to know few points:
  • You should not use SharePoint ‘system account’ to test workflow. If you use ‘system account’ to develop/run workflow, the workflow will fail to run.
  • You need to make sure User Profile Service (UPS) is running and the user who is running workflow has profile in UPS. Workflow Manager use UPS under the hood.
  • Make sure App Management Service is created and running. You don’t need to configure SharePoint 2013 App settings in the server, just creating App Management service (with proxy) will do.
  • SharePoint 2013 workflow is declarative – means you can only define workflow in XML. You can’t write any C# code inside workflow as you used to do before. All your custom logic should be put outside of SharePoint, inside WCF Service. Then you will call the service from workflow to implement your custom logic in code.
  • To register workflow Server with SharePoint, a SharePoint site collection URL is provided (see the section Register Workflow Service with SharePoint later in the post). Apparently it seems, each and every site collection need to be registered with workflow server. But it’s not, registering a single SharePoint site  collection, will enable workflow manager for all SharePoint web applications/site collections.
-->

Install/Configure Workflow Manager

The first step in workflow setup/configuration is to install workflow manager in the workflow server (either Web Front End or a separate server). To install the workflow Manager download it from Microsoft Site or alternatively you can download it from Web Platform Installer. The installation contains few components:
  • Workflow Manager: This is the host that runs workflows.
  • Workflow Manager Client: It contains the API to allow clients to communicate with Workflow host.
  • Workflow Tool: It needs to be installed in the development server to develop SharePoint 2013 workflow. It supports the workflow development in Visual Studio 2012.
Workflow Manager client needs to be installed in every SharePoint WFE server.
After installing Workflow Manger, you can configure workflow manager with Workflow Manager Configuration Wizard. The configuration involves two steps: Workflow Manager Configuration and Service Bus Configuration.
  • Workflow Manger Configuration (first step in the wizard) is the configuration related to work host server
  • Service Bus configuration (second step in the wizard): Service Bus is used to manage communication between Workflow Server and it’s client (so, SharePoint). Service Bus queues the income request to workflow manage, provide REST interface for Workflow Manager etc.
In workflow configuration wizard don’t use any admin or SharePoint setup user, create a new service user for workflow and use that user:
image
Figure 1: Workflow Manager Service Account


If you want SharePoint Server to communicate with Workflow Server over HTTP, you can select the option shown below. But please make sure this is secure in your case. For public site, this might not be secure but in case of Local Intranet with firewall, this might be secure.
image
Figure 2: Communication over HTTP


If you want to use the same service account (as well as auto generated key for certificate), you can use so as shown below:
image
Figure 3: Same service account and certificate key is used for both Workflow Manager and Service Bus Configuration.
In the final step of the workflow configuration wizard you can generate PowerShell script that you can reuse across different SharePoint Farms.

Register Workflow Service with SharePoint

Once you have installed/configured Workflow Server, you need to register the workflow service to SharePoint Server. The registration depends on how the SharePoint and Workflow server is connected to each other. You can find more details at technet site. The workflow manager creates an HTTPS endpoint at port 12291 and HTTP port at 12290. If you use HTTP for communication you need to provide ‘AllowOAuthHttp’ switch in the PowerShell command. The PowerShell command looks like below:
Communication over HTTP
Register-SPWorkflowService –SPSite http://sharepointsite –WorkflowHostUri http://workflowhost:12291 –AllowOAuthHttp

Communication over HTTPS
Register-SPWorkflowService –SPSite http://sharepointsite –WorkflowHostUri https://workflowhost:12290

PowerShell Script to Install/Configure Workflow Manager

I have modified the wizard-generated PowerShell script a bit to make it more reusable. The Script reads configuration values from xml file and apply the configuration. The script uses auto-generate key for certificate. Also the database name are hard-coded in the script, but you can add prefixes (like dev, test, prod) to the database from xml file. The script also configure App Management Service, if the service is not already created. The sample PowerShell Script is provided below:
#Get current user full login name
$CurrentUserLoginName=[Environment]::UserName + '@' + [Environment]::UserDomainName;

#Get current server fully qualified domain name
$HostFQDN="$env:computername.$env:userdnsdomain";

#Load SharePoint Snapin
if ( (Get-PSSnapin -Name Microsoft.SharePoint.PowerShell -ErrorAction SilentlyContinue) -eq $null ){  
    Add-PsSnapin Microsoft.SharePoint.PowerShell
}

#Get DB Connection String
function GetDBConnectionString([string]$connectionStringFormat, [string]$dbPrefix, [string]$dbName){
    if($dbPrefix -ne ""){
        $dbFullName=$(GetDBName $dbPrefix $dbName);
        return [string]::Format($connectionStringFormat,$dbFullName);
        }
    else {
        return $dbName;
    }
}
#Add Dev, Test etc. environment prefix, if needed
function GetDBName([string]$dbPrefix,[string]$dbName){
    if(($dbPrefix) -and ($dbPrefix -ne "")){
        return $dbPrefix + "_" + $dbName;
    }
    return $dbName;
}

#Get current Script directory
function Get-ScriptDirectory
{
  $Invocation = (Get-Variable MyInvocation -Scope 1).Value
  Split-Path $Invocation.MyCommand.Path
}

function ConfigureWFManager([string]$settingsFile){
    [xml]$wfsettings = Get-Content $settingsFile
    $settings=$wfsettings.Settings;
    $SharePointSiteUrl=$settings.SiteUrl;
    $dbPrefix=$settings.DBPrefix;
    $CertificateKey=$settings.CertificationKey;
    $databaseServer=$settings.DBServer;
    $ConnectionStringFormat="Data Source=$databaseServer;Initial Catalog={0};Integrated Security=True;Encrypt=False";
    $RunAsAccount=$settings.WFManagerRunAsAccount;
    $WorkflowNamespace=$settings.WorkflowNamespace;

    # To be run in Workflow Manager PowerShell console that has both Workflow Manager and Service Bus installed.
    # Create new Service Bus Farm
    $SBCertificateAutoGenerationKey = ConvertTo-SecureString -AsPlainText  -Force  -String $CertificateKey -Verbose;

    New-SBFarm -SBFarmDBConnectionString $(GetDBConnectionString $connectionStringFormat $dbPrefix 'SBManagementDB')  -InternalPortRangeStart 9000 -TcpPort 9354 -MessageBrokerPort 9356 -RunAsAccount $RunAsAccount -AdminGroup 'BUILTIN\Administrators' -GatewayDBConnectionString $(GetDBConnectionString $connectionStringFormat $dbPrefix 'SBGatewayDB') -CertificateAutoGenerationKey $SBCertificateAutoGenerationKey -MessageContainerDBConnectionString $(GetDBConnectionString $connectionStringFormat $dbPrefix 'SBMessageContainerDB') -Verbose;

    # To be run in Workflow Manager PowerShell console that has both Workflow Manager and Service Bus installed.

    # Create new Workflow Farm
    $WFCertAutoGenerationKey = ConvertTo-SecureString -AsPlainText  -Force  -String $CertificateKey -Verbose;


    New-WFFarm -WFFarmDBConnectionString $(GetDBConnectionString $connectionStringFormat $dbPrefix 'WFManagementDB') -RunAsAccount $RunAsAccount -AdminGroup 'BUILTIN\Administrators' -HttpsPort 12290 -HttpPort 12291 -InstanceDBConnectionString $(GetDBConnectionString $connectionStringFormat $dbPrefix 'WFInstanceManagementDB') -ResourceDBConnectionString $(GetDBConnectionString $connectionStringFormat $dbPrefix 'WFResourceManagementDB') -CertificateAutoGenerationKey $WFCertAutoGenerationKey -Verbose;

    # Add Service Bus Host
    $SBRunAsPassword = ConvertTo-SecureString -AsPlainText  -Force  -String $CertificateKey -Verbose;


    Add-SBHost -SBFarmDBConnectionString $(GetDBConnectionString $connectionStringFormat $dbPrefix 'SBManagementDB') -RunAsPassword $SBRunAsPassword -EnableFirewallRules $true -CertificateAutoGenerationKey $SBCertificateAutoGenerationKey -Verbose;

    Try
    {
        # Create new Servie Bus Namespace
        New-SBNamespace -Name $WorkflowNamespace -AddressingScheme 'Path' -ManageUsers $RunAsAccount,$CurrentUserLoginName -Verbose;

        Start-Sleep -s 90
    }
    Catch [system.InvalidOperationException]
    {
    }

    # Get Service Bus Client Configuration
    $SBClientConfiguration = Get-SBClientConfiguration -Namespaces $WorkflowNamespace -Verbose;

    # Add Workflow Host
    $WFRunAsPassword = ConvertTo-SecureString -AsPlainText  -Force  -String $CertificateKey -Verbose;


    Add-WFHost -WFFarmDBConnectionString $(GetDBConnectionString $connectionStringFormat $dbPrefix 'WFManagementDB') -RunAsPassword $WFRunAsPassword -EnableFirewallRules $true -SBClientConfiguration $SBClientConfiguration -EnableHttpPort  -CertificateAutoGenerationKey $WFCertAutoGenerationKey -Verbose;

}


Write-Host "Configuring WF Manager"
$location=Get-ScriptDirectory
ConfigureWFManager "$location\WFFarmSettings.xml"
Code Snippet: PowerShell Script to configure Workflow Manager

The following XML file provides the input settings for the above PowerShell script. Though you will use a site collection to register the workflow and SharePoint communication, I’ve found that workflow work for all others site collections/web application in the SharePoint Server.
<Settings>
  <SiteUrl>http://SharepointSiteCollection</SiteUrl>
  
  <!--Delete DBPrefix tag, if you don't want any prefix-->
  <DBPrefix>DEV</DBPrefix>
  
  <!--Key used to generate certificates-->
  <CertificationKey>CertificationKey</CertificationKey>
  
  <!--Database server name, database names are hardcoded in powershell-->
  <DBServer>WFE1\SQLExpress</DBServer>
  
  <!--Format should be USERNAME@DOMAIN-->
  <WFManagerRunAsAccount>SP_DEV_WFManager@Domain</WFManagerRunAsAccount>

  <!--dot (.) not allowed-->
  <WorkflowNamespace>contoso-workflow</WorkflowNamespace>
  
  <!--To work with workflow, app management service need to be provisioned-->
  <AppManagementService Provision="true">
    <Name>App Management Service Application</Name>
    <DBName>AppManagementServiceDB</DBName>
    <!--If managed account already exists with the same name, the existing one will be used-->
    <ManagedAccountUserName>domain\SP_DEV_Services</ManagedAccountUserName>
    <ManagedAccountPassword>password</ManagedAccountPassword>
    <AppPoolName>App Management Service App Pool</AppPoolName>
  </AppManagementService>
</Settings>

Tuesday, March 26, 2013

How to fix Windows 8 administrator restriction policy

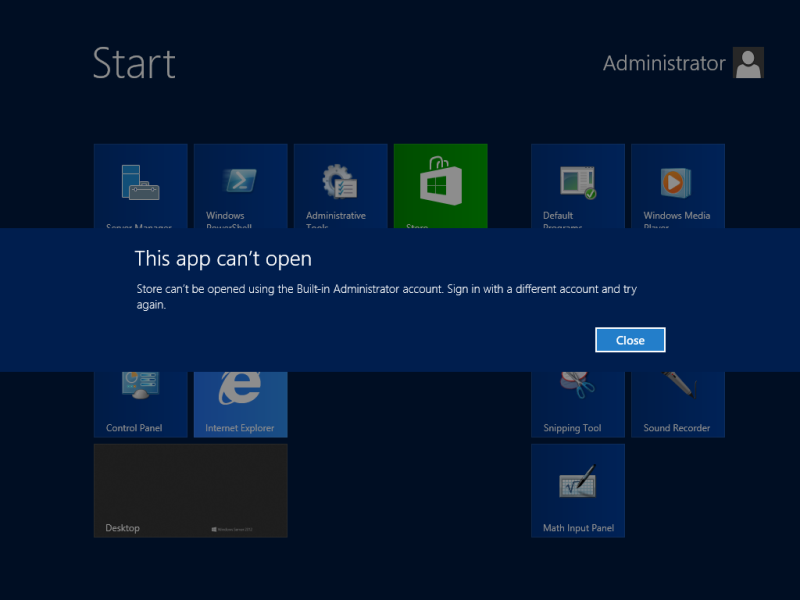
You got any of these annoying errors with Built-in Administrator account on Windows 8?
This app can't open
can't be opened using the Built-in Administrator account. Sign in with a different account and try again.


--> This app can't open can't be opened using the Built-in Administrator account. Sign in with a different account and try again. windows 8

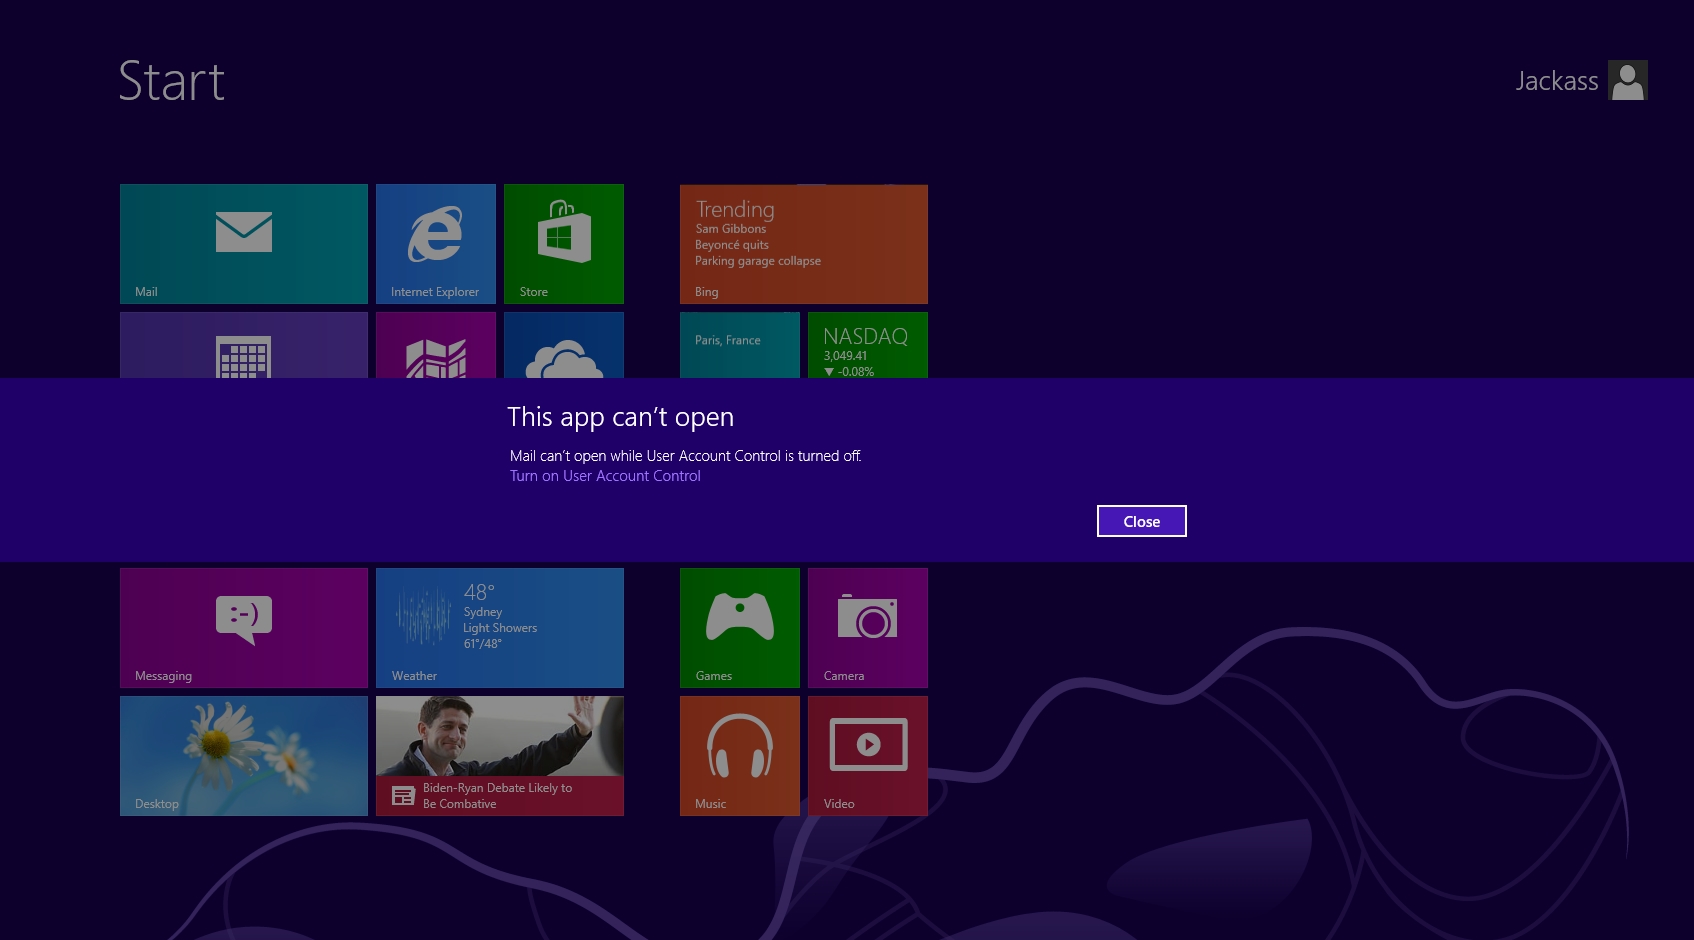
or?
This app can't open
can't open while User Account Control is turned off.
Turn on User Account Control

This app can't open can't open while User Account Control is turned off. Turn on User Account Control

Here is the solution:

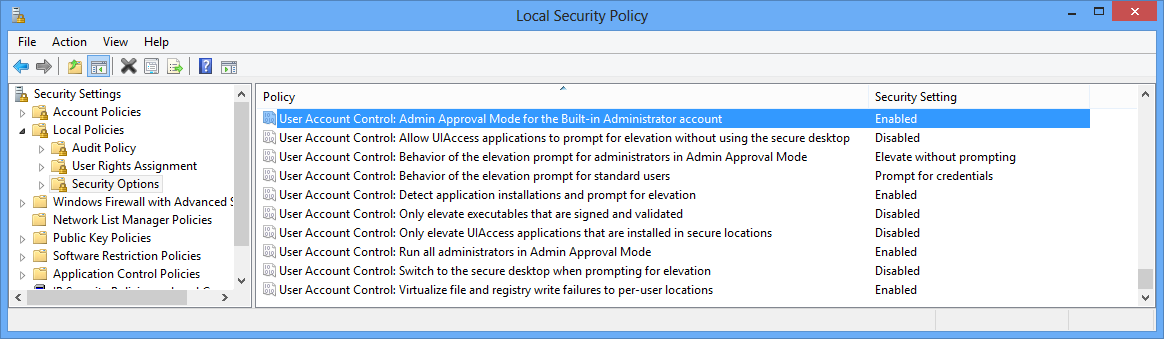
1. Local Security Policy - Run "secpol.msc" and modify as in screenshot.


-->
User Account Control: Admin Approval Mode for the built-in Administrator Account

2. Edit Registry - Run "regedit" and change the value as in screenshot

HKEY_LOCAL_MACHINE\SOFTWARE\Microsoft\Windows\CurrentVersion\Policies\System EnableLUA 1

3. Reboot your System and now you can run all metro Apps as Administrator. 

Friday, March 22, 2013

How to Warm up SharePoint 2010 Sites using PowerShell


Warming up SharePoint 2010 using PowerShell


 If you’ve been around SharePoint 2007, SharePoint 2010 or just .NET for any amount of time, you know that pages are not compiled until the first time a server request is made to view them. This causes the first load to be the slowest.
There have been numerous solutions for this, most of them are some form of a warm-up script.
In SharePoint 2007, there were a few versions; all of which used the command-line STSADM tool to basically enumerate all sites in a web application and then submit an HTTP request to cache the pages on the server side.
In SharePoint 2010, the STSADM based scripts still work; but why use them? We have PowerShell!
I found some really good examples of PowerShell based Warm-up scripts, but none of them served my purposes or my clients. Since I’m really starting to dig PowerShell, I decided to do my part in the SharePoint community by developing my own version of the SPWarmup script.
-->
1
2
3
4
5
6
7
8
9
10
11
12
13
14
15
16
17
18
19
20
21
22
23
24
25
26
27
28
29
30
31
32
33
34
35
36
37
38
39
40
41
42
43
44
45
46
47
48
49
50
51
52
53
54
55
56
57
58
59
60
#################################################################################
## SPWarmUp.ps1 - Enumerates all web sites in web applications in a SharePoint  #
## 2010 farm and opens each in a browser.  This version does not use STSADM #
## and instead uses PowerShell.                         #
##                                      #
## Notes:                                   #
## -"get-webpage" function borrowed from:                   #
##                                      #
## Assumptions:                                 #
## -Running on machine with SharePoint 2010 installed               #
## Although bits and pieces were borrowed from Kirk Hofer and Martin Laukkanen, #
## The final working version with nice enhancements is courtesy of Ryan Dennis. #
## www.iccblogs.com/blogs/rdennis - Twitter: @SharePointRyan            #
#################################################################################
   
Add-PSSnapin Microsoft.SharePoint.PowerShell -ErrorAction SilentlyContinue
# By uncommenting the following lines as well as lines 54-60 you can warmup other sites such as SSRS #
#$extrasitelistfile = 'c:\warmup-extrasites.txt'
Start-SPAssignment -Global 
function get-webpage([string]$url,[System.Net.NetworkCredential]$cred=$null)
{
   $wc = new-object net.webclient
   if($cred -eq $null)
   {
     $cred = [System.Net.CredentialCache]::DefaultCredentials;
   }
   $wc.credentials = $cred;
   return $wc.DownloadString($url);
}
   
#This passes in the default credentials needed. If you need specific
#credentials you can pass them in to elevate the permissions.
#Or run this task as a user that has a Policy above all the Web
#Applications with the correct permissions
   
$cred = [System.Net.CredentialCache]::DefaultCredentials;
#$cred = new-object System.Net.NetworkCredential("username","password","machinename")
   
$apps = Get-SPWebApplication -IncludeCentralAdministration
foreach ($app in $apps) {
$sites = Get-SPSite -WebApplication $app.url -Limit ALL -ErrorAction SilentlyContinue -WarningAction SilentlyContinue
foreach ($site in $sites) {
Write-Host $site.Url;
$html=get-webpage -url $site.Url -cred $cred;
}
}
## Warm up other sites specified in warmup-extrasites.txt file (such as SSRS)
#if (test-path $extrasitelistfile) {
#   $extrasites = get-content $extrasitelistfile
#   foreach ($site in $extrasites) {
#     write-host $site;
#     $html=get-webpage -url $site -cred $cred;
#   }
#}
Stop-SPAssignment -Global